
The latest series of NIKON Z series firmware updates (Z6/7 3.3, Z6ll 1.2) have finally convinced me to try 3D Tracking autofocus. The new firmware has made this much more precise and therefore more interesting to me, particularly with circus performers hurling themselves all over the place in front of my lens…
These settings were available from the previous firmware update – this update has just made them more accurate.
The 3D Tracking works very differently depending on which Focus Mode has been selected, and this can make a huge difference to the way you capture your images.
AF-S Single AF – once you have identified/selected the area/object to track, the camera will automatically follow the selection until you press the button to which you have assigned the 3D Tracking, turning it off – turning it again on allows you to change your selection.
AF-C Continuous AF – you must keep your finger on the AF-ON button to ‘force’ the 3D Tracking to follow the subject. Releasing the AF-ON button effectively resets the selection and you can select another area.
There are just three steps to setting up 3D Tracking autofocus.
Step 1 – In the Custom Setting Menu, select A7 – AF Activation and select AF-ON only. This will turn on the AF-ON button for focusing.(This should ALWAYS be activated, IMHO)
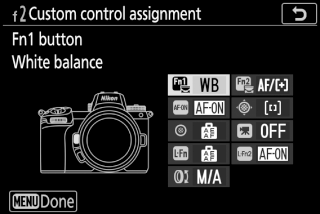
Step 2 – Still in the Custom Setting Menu, select F2 – Custom control assignment and set one of the buttons to Subject Tracking – I’ve chosen the Fn2 button by the lens
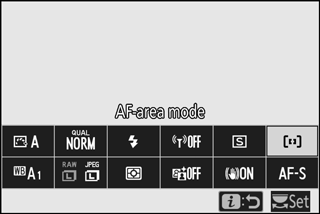
Step 3 – change the Focus mode to Auto-area AF – this is done by clicking the ‘I’ (info) button and using the joystick to navigate to the Focus mode logo – click on that and the choice of focus modes is displayed – select Auto-Area AF (at the right)
Using 3D tracking is relatively simple, but takes a bit of getting used to. When the Fn2 (in my example) button is pressed a large white square outline lights up in the middle of the viewfinder – point the camera to the area/object you wish to track and press the AF-ON button. Depending on the Focus Mode selected (AF-S Single point or AF-C Continuous) the camera will react differently.
As previously stated, in AF-S mode, once you have identified/selected the area/object to track, the camera will automatically follow the selection until you press the button to which you have assigned the 3D Tracking, turning it off – turning it again on allows you to change your selection.
In AF-C mode, you must keep your finger on the AF-ON button to ‘force’ the 3D Tracking to follow the subject. Releasing the AF-ON button effectively resets the selection and you can select another area.
The nice thing is that all of this can be saved to one of the ‘U’ settings – you could, for example, set U2 to Auto ISO, normal (spot) AF and U3 to the same Auto ISO but with 3D tracking – that way if the movement was too rapid for the camera using 3D tracking, you can quickly change back to ‘regular’ continuous AF with the U2 setting.
At my next circus residence I’ll be able to do some real-world testing of these two options – I’ll let you know how I get on.